本系列第一篇文章,我们探索了对象是怎么创建的的,那么操作系统是怎么管理内存中对象的声明周期呢?也就是内存管理,本文会探索内存管理的底层原理。
目标 本文的主要探索如下:
1、MRC 是什么?
2、ARC 是什么?与 MRC 的区别?
3、TaggedPointer 对象?
3、普通对象的引用计数是怎么管理的?
4、普通对象时怎么销毁的?
5、strong weak assign copy?
6、自动释放池的工作原理
字节序 要了解内存中的数据,我们需要知道内存中数据的排列方式。这就涉及到了 LittleEndian(小端序)和 BigEndian(大端序)。
LittleEndian or BigEndian 我们先了解下字节序,我们都知道数据在内存和磁盘中都是按照字节来存储的,其中存储的顺序就是字节序。现在有两种字节序,分别是 LittleEndian(小端序)和 BigEndian(大端序)。更多资料见 字节顺序 .
小端序的特点:数据低字节数据在内存低地址中存储,高字节数据在内存高地址中存储。
x86 和 ARM 系列处理器使用的是小端序,下面我们通过代码验证下:
方式 1:调用 API
1
2
3
4
5
6
7
if (NSHostByteOrder () == NS_LittleEndian ) { NSLog (@"LittleEndian" ); } else if (NSHostByteOrder () == NS_BigEndian ){ NSLog (@"BigEndian" ); } else { NSLog (@"Unknow" ); }
方式 2:看内存中的数据排列方式
1
2
3
UInt32 value = 0xa1b2c3d4 ;NSLog (@"%p" , &value);NSLog (@"%d" , value);
在 NSLog 地方下断点,然后使用 lldb 指令查看内存数据。
1
2
3
4
5
(lldb) p &value (UInt32 *) $0 = 0x00007ffeeacf010c (lldb) x 0x00007ffeeacf010c 0x7ffeeacf010c: d4 c3 b2 a1 b0 77 40 6c 94 7f 00 00 48 54 f1 04 .....w@l....HT.. 0x7ffeeacf011c: 01 00 00 00 29 8c 35 5e ff 7f 00 00 b0 77 40 6c ....).5^.....w@l
输出的内存结果是 d4 c3 b2 a1, 也就是数据低字节数据存储在内存低地址中,所以是小端序。
MRC 在 iOS 中,引用类型对象的内存管理是通过引用计数(Reference Counting)来管理的。每个对象在使用的过程中都有各自的引用计数,当引用计数为 0 的时候,对象会被销毁,对象占用的内存将会被释放。
管理引用计数主要有两种方式,MRC 和 ARC。 MRC 是 Manual Reference Counting 的缩写,就是手动管理对象的引用计数。在早期的开发中,可以使用以下的代码管理引用计数。
1
2
3
4
5
MyClass *foo = [[MyClass alloc] init]; [foo retain ]; [foo release]; MyClass *bar = [foo copy ]; [foo autorelease];
ARC 在现在的开发中,是使用 ARC (Automatic Reference Counting) 技术来管理 App 中对象的内存使用的。
我们无需在代码中添加上述的引用计数管理代码了,这件事情编译器会在编译期帮我们做。也就是在编译的时候,编译器会在我们代码中的合适位置添加上 retain, release, copy, autorelease 和 autoreleasepool 语句。这样我们就可以专注于功能开发了。
TaggedPointer 为了提高性能和减少内存使用,Apple 开发出一种叫 tagged pointer(标记指针) 的技术。这项技术被应用在一些系统提供的一些小对象上,比如 NSString, NSDate, NSNumber 等。
前面我们了解到对象在内存中是对齐分布的,也就是它们的地址通常是 16 的倍数。比如对象指针是一个 64 位的整数,为了对齐,内存地址的一些位永远是 0。我们看一下如下对象的地址。
1
2
3
4
5
6
7
8
9
10
NSObject *objc = [[NSObject alloc] init];UILabel *label = [[UILabel alloc] init];UIView *view = [[UIView alloc] init];UIButton *button = [[UIButton alloc] init];UIViewController *controller = [[UIViewController alloc] init]; NSArray *array = @[objc, label, view, button, controller];for (NSObject *obj in array) { NSLog (@"%p" , obj); }
打印结果如下:
1
2
3
4
5
2020-11-26 20:39:58.776037+0800 OCDemo[14579:347545] 0x60000308c6f0 2020-11-26 20:39:58.776203+0800 OCDemo[14579:347545] 0x7ffd8e40b2d0 2020-11-26 20:39:58.776281+0800 OCDemo[14579:347545] 0x7ffd8e40d1f0 2020-11-26 20:39:58.776380+0800 OCDemo[14579:347545] 0x7ffd8e40d360 2020-11-26 20:39:58.776481+0800 OCDemo[14579:347545] 0x7ffd8e40df90
从打印结果看,内存地址的值没有完全占满 8 个字节 64 位。所以肯定有空余字节上全是 0 。
Tagged Pointer 正好使用了这一特点,它给那些最高位不为 0 的对象赋予了特别的含义。在 Objective-C 的 64 位实现中,最高位为 1 的的对象指针就被视为 Tagged Pointer(标记指针)。剩下的 3 位为已标记类表的索引,该索引用于查找标记指针的类。剩下的 60 位用来存储标记类的数据。
在 Objective-C 中,tagged pointer 的地址值做了混淆处理,混淆的代码实现是这样的:
1
2
3
4
5
6
7
extern uintptr_t objc_debug_taggedpointer_obfuscator;static inline void * _Nonnull_objc_encodeTaggedPointer(uintptr_t ptr) { return (void *)(objc_debug_taggedpointer_obfuscator ^ ptr); }
所以,想要看到 tagged pointer 的真实值,我们需要对混淆值进行还原:
1
2
3
4
5
static inline uintptr_t_objc_decodeTaggedPointer(const void * _Nullable ptr) { return (uintptr_t)ptr ^ objc_debug_taggedpointer_obfuscator; }
通过如下代码的打印,我们可以看出一些规律。
1
2
3
4
5
6
7
8
9
10
11
12
13
14
15
16
17
18
NSString *a = [NSString stringWithFormat:@"%@" , @"a" ];NSString *ab = [NSString stringWithFormat:@"%@" , @"ab" ];NSString *abc = [NSString stringWithFormat:@"%@" , @"abc" ];NSString *abcd = [NSString stringWithFormat:@"%@" , @"abcd" ];NSString *abcde = [NSString stringWithFormat:@"%@" , @"abcde" ];NSString *abcdef = [NSString stringWithFormat:@"%@" , @"abcdef" ];NSString *abcdefg = [NSString stringWithFormat:@"%@" , @"abcdefg" ];NSString *abcdefgh = [NSString stringWithFormat:@"%@" , @"abcdefgh" ];NSString *abcdefghi = [NSString stringWithFormat:@"%@" , @"abcdefghi" ];NSString *abcdefghij = [NSString stringWithFormat:@"%@" , @"abcdefghij" ]; NSArray *strings = @[a, ab, abc, abcd, abcde, abcdef, abcdefg, abcdefgh, abcdefghi, abcdefghij]; for (int i = 0 ; i < strings.count; i++) { NSString *str = strings[i]; NSLog (@"%@ -> 0x%lx" , object_getClass(str), _objc_decodeTaggedPointer_(str)); }
下面是打印结果:
1
2
3
4
5
6
7
8
9
10
NSTaggedPointerString -> 0xa000000000000611 NSTaggedPointerString -> 0xa000000000062612 NSTaggedPointerString -> 0xa000000006362613 NSTaggedPointerString -> 0xa000000646362614 NSTaggedPointerString -> 0xa000065646362615 NSTaggedPointerString -> 0xa006665646362616 NSTaggedPointerString -> 0xa676665646362617 NSTaggedPointerString -> 0xa0022038a0116958 NSTaggedPointerString -> 0xa0880e28045a5419 __NSCFString -> 0x8f7a2cfe334ef33
上面的打印结果,当字符串的长度小于等于 9 时,字符串的类型是 NSTaggedPointerString, 当长度大于 9 时,字符串的类型是 __NSCFString。也就是用于存储数据的位数用完后,Tagged Pointer 类型会转换为对象类型。
下面我们分析一下,为什么前四个二进制位会是 a 呢。a 转换为二进制是 1010, 第一位 1 表示是 tagged pointer 类型。剩下的 010 转换成十进制是 2,那么 2 又表示的是啥?在源码中,我们找到了 tagged pointer 的相关类型声明。
1 2 3 4 5 6 7 8 9 10 11 OBJC_TAG_NSAtom = 0 , OBJC_TAG_1 = 1 , OBJC_TAG_NSString = 2 , OBJC_TAG_NSNumber = 3 , OBJC_TAG_NSIndexPath = 4 , OBJC_TAG_NSManagedObjectID = 5 , OBJC_TAG_NSDate = 6 , OBJC_TAG_RESERVED_7 = 7 ,
通过源代码,我们了解了 tagged pointer 这一特殊的类型。
引用计数管理 引用计数管理部分,我们将会通过源码的方式去探索。
retainCount 首先探索引用计数的读取,通过 retainCount 方法,我们可以获取一个对象的引用计数。
1
2
3
NSObject *objc = [[NSObject alloc] init];NSInteger count = [objc retainCount];NSLog (@"count = %ld" , (long )count);
我们在 objc 中的源码中,retainCount 方法最终是通过调用 objc_object::rootRetainCount 方法来完成的,我们看看实现逻辑:
1 2 3 4 5 6 7 8 9 10 11 12 13 14 15 16 17 18 19 20 21 inline uintptr_t objc_object::rootRetainCount() { if (isTaggedPointer()) return (uintptr_t)this ; sidetable_lock(); isa_t bits = LoadExclusive(&isa.bits); ClearExclusive(&isa.bits); if (bits.nonpointer) { uintptr_t rc = 1 + bits.extra_rc; if (bits.has_sidetable_rc) { rc += sidetable_getExtraRC_nolock(); } sidetable_unlock(); return rc; } sidetable_unlock(); return sidetable_retainCount(); }
通过 objc_object::rootRetainCount 方法我们可以看出,普通对象的引用计数是 1 + bits.extra_rc 的和。如果还有 has_sidetable_rc 的话,还需要加上 sidetable 中的值。
1
2
uintptr_t has_sidetable_rc : 1 ; uintptr_t extra_rc : 19
在 __arm64__ 中, isa 的 extra_rc 是使用 19 位来存储引用计数值的。当 19 位不够用的时候,会将部分值存储到全局的引用计数表中。
我们通过代码的方式,在不使用 sidetable 的情况下,最多可以存储多少个引用计数,理论上是 2^19 - 1 个。
1
2
3
4
5
6
7
8
NSObject *objc = [[NSObject alloc] init];NSInteger maxValue = (1 << 19 ) - 2 ;for (NSInteger i = 0 ; i < maxValue; i++) { [objc retain ]; } NSInteger count = [objc retainCount];NSLog (@"count = %ld" , (long )count); NSLog (@"maxValue = %ld" , maxValue);
这时候打印的是:
我们使用 lldb 的方式看下,isa 中 extra_rc 和 has_sidetable_rc 是多少,首先计算好我们的 mask 如下:
1
2
3
// nonponter 0x0000000000000001ULL // extra_rc 0xFFFFE00000000000ULL >> 45 // has_sidetable_rc 0x0000100000000000ULL >> 44
lldb 的结果如下,和我们前面打印的结果是一直的。
1
2
3
4
5
6
7
8
9
(lldb) p objc (NSObject *) $0 = 0x0000000282e34d10 (lldb) x/4gx 0x0000000282e34d10 0x282e34d10: 0xffffe1a207353249 0x0000000000000000 0x282e34d20: 0x0000f2b63bfc4d20 0x0000646c252000d4 (lldb) p (0xffffe1a207353249 & 0xFFFFE00000000000ULL) >> 45 (unsigned long long) $1 = 524287 // 引用计数值 (lldb) p (0xffffe1a207353249 & 0x0000100000000000ULL) >> 44 (unsigned long long) $2 = 0 // 是否使用全局引用计数表
如果我们在这个的基础上 [objc retain] 再增加一个引用计数,那么 extra_rc 和 has_sidetable_rc 又是多少呢?
使用 lldb 调试的结果如下:
1
2
3
4
5
6
7
8
9
10
2020-12-02 14:24:43.974122+0800 OCDemo[38570:16903241] count = 524288 (lldb) p objc (NSObject *) $0 = 0x0000000280a005b0 (lldb) x/4gx 0x0000000280a005b0 0x280a005b0: 0x800011a207353249 0x0000000000000000 0x280a005c0: 0x0000752f7d9005c0 0x0000646c2520005e (lldb) p (0x800011a207353249 & 0xFFFFE00000000000ULL) >> 45 (unsigned long long) $1 = 262144 (lldb) p (0x800011a207353249 & 0x0000100000000000ULL) >> 44 (unsigned long long) $2 = 1 // 是否使用全局引用计数表
从调试结果看,这次是使用了全局引用计数表,并且 extra_rc 中存的值,只有引用计数总数的一半。也就是当引用计数超过了 524287 就会使用全局引用计数表。
retain retain 方法的功能是,对象的引用计数加 1。 在源码中,该方法是通过调用 objc_object::rootRetain 方法来实现的,我们看看源码逻辑:
1
2
3
4
5
6
7
8
9
10
11
12
13
14
15
16
17
18
19
20
21
22
23
24
25
26
27
28
29
30
31
32
33
34
35
36
37
38
39
40
41
42
43
44
45
46
47
48
49
50
51
52
53
54
55
56
57
58
59
ALWAYS_INLINE id objc_object::rootRetain(bool tryRetain, bool handleOverflow) { if (isTaggedPointer()) return (id )this ; bool sideTableLocked = false ; bool transcribeToSideTable = false ; isa_t oldisa; isa_t newisa; do { transcribeToSideTable = false ; oldisa = LoadExclusive(&isa.bits); newisa = oldisa; if (slowpath(!newisa.nonpointer)) { ClearExclusive(&isa.bits); if (rawISA()->isMetaClass()) return (id )this ; if (!tryRetain && sideTableLocked) sidetable_unlock(); if (tryRetain) return sidetable_tryRetain() ? (id )this : nil ; else return sidetable_retain(); } if (slowpath(tryRetain && newisa.deallocating)) { ClearExclusive(&isa.bits); if (!tryRetain && sideTableLocked) sidetable_unlock(); return nil ; } uintptr_t carry; newisa.bits = addc(newisa.bits, RC_ONE, 0 , &carry); if (slowpath(carry)) { if (!handleOverflow) { ClearExclusive(&isa.bits); return rootRetain_overflow(tryRetain); } if (!tryRetain && !sideTableLocked) sidetable_lock(); sideTableLocked = true ; transcribeToSideTable = true ; newisa.extra_rc = RC_HALF; newisa.has_sidetable_rc = true ; } } while (slowpath(!StoreExclusive(&isa.bits, oldisa.bits, newisa.bits))); if (slowpath(transcribeToSideTable)) { sidetable_addExtraRC_nolock(RC_HALF); } if (slowpath(!tryRetain && sideTableLocked)) sidetable_unlock(); return (id )this ; }
这个方法的主要逻辑是这样的:
如果是 pointer isa,直接将全局引用计数表中的对象引用计数 + 1
如果是 nonpointer isa,先将 isa 中的引用计数 extra_rc + 1,看是否超出了 19 位的存储范围。
如果超出了范围,将 RC_HALF (2^18) 存入到 extra_rc 中,将剩下的 RC_HALF (2^18) 添加到 sideTable 中。
全局引用计数表增加引用计数是调用 objc_object::sidetable_addExtraRC_nolock 方法来完成的,我们看看这个方法的实现:
1
2
3
4
5
6
7
8
9
10
11
12
13
14
15
16
17
18
19
20
21
22
23
24
25
26
27
bool objc_object::sidetable_addExtraRC_nolock(size_t delta_rc) { ASSERT(isa.nonpointer); SideTable& table = SideTables()[this ]; size_t& refcntStorage = table.refcnts[this ]; size_t oldRefcnt = refcntStorage; ASSERT((oldRefcnt & SIDE_TABLE_DEALLOCATING) == 0 ); ASSERT((oldRefcnt & SIDE_TABLE_WEAKLY_REFERENCED) == 0 ); if (oldRefcnt & SIDE_TABLE_RC_PINNED) return true ; uintptr_t carry; size_t newRefcnt = addc(oldRefcnt, delta_rc << SIDE_TABLE_RC_SHIFT, 0 , &carry); if (carry) { refcntStorage = SIDE_TABLE_RC_PINNED | (oldRefcnt & SIDE_TABLE_FLAG_MASK); return true ; } else { refcntStorage = newRefcnt; return false ; } }
这里计算引用计数的时候,会先将 delta_rc << 2, 然后再加旧的引用计数,这么做的原因是。低两位不参与引用计数计算,低两位分别别是:
1 2 #define SIDE_TABLE_WEAKLY_REFERENCED (1UL<<0) #define SIDE_TABLE_DEALLOCATING (1UL<<1)
release release 方法的作用是将对象的引用计数减 1。我们看下这个方法的关键实现:
1
2
3
4
5
6
7
8
9
10
11
12
13
14
15
16
17
18
19
20
21
ALWAYS_INLINE bool objc_object::rootRelease(bool performDealloc, bool handleUnderflow) { if (isTaggedPointer()) return false ; bool sideTableLocked = false ; isa_t oldisa; isa_t newisa; retry: underflow: if (performDealloc) { ((void (*)(objc_object *, SEL))objc_msgSend)(this , @selector (dealloc)); } return true ; }
release 方法主要做了三件事情:
如果是 pointer isa,直接调用 sidetable_release 将全局引用计数表的 count - 1。
如果是 nonpointer isa,则将 isa 中的 extra_rc 值减 1,然后判断是否发生了借位,如果有借位:
如果此时还有 has_sidetable_rc, 直接取出 RC_HALF, 然后将 RC_HALF - 1 的值存到 isa 的 extra_rc 中。
如果此时没有 has_sidetable_rc, 则发送 dealloc 消息析构对象。
autoRelease 对象调用 autoRelease 后,自动释放池释放的时候,才会销毁该对象。autoRelease 方法的关键实现是:
1
2
3
4
5
6
7
__attribute__((noinline,used)) id objc_object::rootAutorelease2() { ASSERT(!isTaggedPointer()); return AutoreleasePoolPage::autorelease((id )this ); }
dealloc 当对象调用 dealloc 方法后会执行哪些流程呢?下面我们探索下对象的析构流程。
调用 dealloc 后,会依次调用如下方法:
_objc_rootDeallocobj->rootDealloc()objc_object::rootDealloc 我们重点关注下这个的实现。
1
2
3
4
5
6
7
8
9
10
11
12
13
14
15
16
17
18
inline void objc_object::rootDealloc() { if (isTaggedPointer()) return ; if (fastpath(isa.nonpointer && !isa.weakly_referenced && !isa.has_assoc && !isa.has_cxx_dtor && !isa.has_sidetable_rc)) { assert(!sidetable_present()); free(this ); } else { object_dispose((id )this ); } }
这里析构过程分为了两个分支,如果满足条件 1 ,直接调用 free 方法释放。否则调用 object_dispose 方法继续析构。那么 object_dispose 方法做了些啥?
1
2
3
4
5
6
7
8
9
10
id object_dispose(id obj) { if (!obj) return nil ; objc_destructInstance(obj); free(obj); return nil ; }
objc_destructInstance 方法做了些啥?
1
2
3
4
5
6
7
8
9
10
11
12
13
14
15
void *objc_destructInstance(id obj) { if (obj) { bool cxx = obj->hasCxxDtor(); bool assoc = obj->hasAssociatedObjects(); if (cxx) object_cxxDestruct(obj); if (assoc) _object_remove_assocations(obj); obj->clearDeallocating(); } return obj; }
总结 dealloc 的主要流程如下:
1、 调用 C++ 析构函数
2、 移除关联对象
3、 清除 SideTable 中的引用计数表中的对象
4、 将 SideTable 中的弱引用表中的所有当前对象的引用置为 nil。
5、 free 释放内存
SideTable SideTable 是用于存储引用计数和弱引用的全局哈希表,我们下面看看这个结构:
SideTablesMap 创建时机 SideTablesMap 是总表,在 iPhone 中总共有 8 个 SideTable。至于为什么是 8 个,后面有详述。那么 SideTablesMap 是什么时候创建的呢?
通过全局搜索 SideTablesMap,我们可以找到如下的代码:
1
2
3
4
5
6
void arr_init(void ) { AutoreleasePoolPage::init(); SideTablesMap.init(); _objc_associations_init(); }
这个 arr_init 又是在哪里调用的呢?通过源码查找,在之前介绍过的 map_images_nolock 方法中找到了 arr_init 的调用。也就是说在 App 启动加载到内存的时候就创建了。
SideTablesMap 初始化 SideTablesMap 的初始化做了哪些事情呢?找到了 init 的声明:
1 static objc::ExplicitInit<StripedMap<SideTable>> SideTablesMap;
StripedMap 是啥?可以理解为是一个哈希表,key 是 void* 类型的指针, value是泛型 T,在 SideTablesMap 中,T 是 SideTable 类型。我们看看 SideTablesMap 的定义就知道了。
1
2
3
4
5
6
7
8
9
10
11
12
13
14
15
16
17
18
19
20
21
22
23
enum { CacheLineSize = 64 };template<typename T> class StripedMap {#if TARGET_OS_IPHONE && !TARGET_OS_SIMULATOR enum { StripeCount = 8 }; #else enum { StripeCount = 64 }; #endif struct PaddedT { T value alignas(CacheLineSize); }; PaddedT array[StripeCount]; }
StripeCount 就是哈希表的总数。所以我们前面说在真机中 SideTablesMap 中总共有 8 个 SideTable。
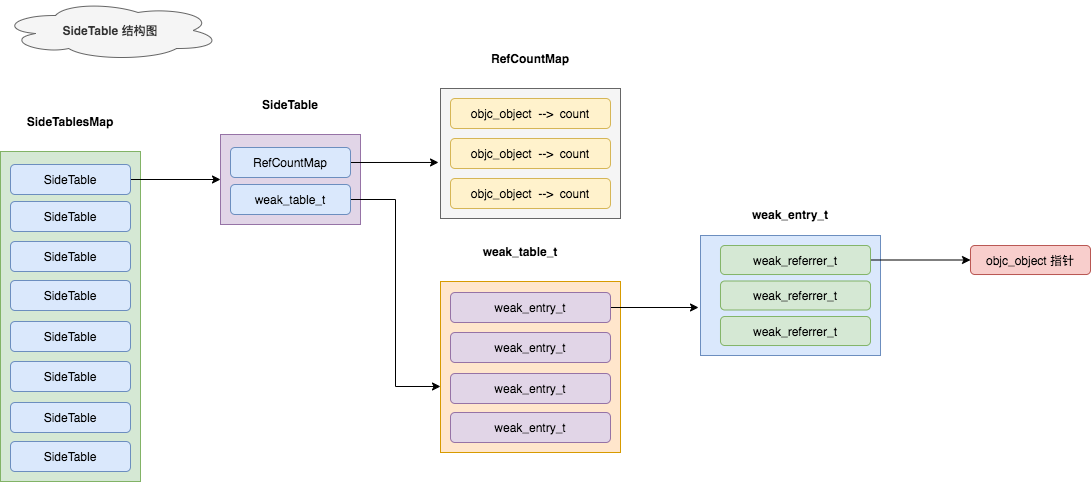
SideTable 结构 SideTable 中包含了哪些内容,这引起了我的好奇心。不妨从 SideTable 定义开始看。
1
2
3
4
5
6
7
8
9
10
11
12
13
14
15
16
17
18
19
20
21
22
23
24
25
26
27
28
29
30
typedef objc::DenseMap<DisguisedPtr<objc_object>,size_t,RefcountMapValuePurgeable> RefcountMap; // Template parameters. enum HaveOld { DontHaveOld = false, DoHaveOld = true }; enum HaveNew { DontHaveNew = false, DoHaveNew = true }; // SideTable 定义 struct SideTable { spinlock_t slock; // 自旋锁 RefcountMap refcnts; // 对象引用计数 map weak_table_t weak_table; // 对象弱引用 map SideTable() { memset(&weak_table, 0, sizeof(weak_table)); } ~SideTable() { _objc_fatal("Do not delete SideTable."); } void lock() { slock.lock(); } void unlock() { slock.unlock(); } void forceReset() { slock.forceReset(); } // Address-ordered lock discipline for a pair of side tables. template<HaveOld, HaveNew> static void lockTwo(SideTable *lock1, SideTable *lock2); template<HaveOld, HaveNew> static void unlockTwo(SideTable *lock1, SideTable *lock2); };
从上述代码中,我们可以清楚的得出 SideTable 的结构:
一个自旋锁 slock,用于控制数据的读写安全。
一个对象引用计数表 refcnts。其中 key 为 objc_object 对象,value 为 size_t 类型值。
一个对象弱引用表 weak_table。这个我们后面会有研究。
weak_table_t 当对象被一个指针变量弱引用后,会将这个指针放到全局弱引用表(weak_table)中,我们探索下这个表的存储原理。
weak_table_t 的定义是这样的:
1
2
3
4
5
6
struct weak_table_t { weak_entry_t *weak_entries; size_t num_entries; uintptr_t mask; uintptr_t max_hash_displacement; };
weak_entry_t 的定义是这样的:
1
2
3
4
5
6
7
8
9
10
11
12
13
14
15
16
17
18
19
20
typedef DisguisedPtr<objc_object *> weak_referrer_t;struct weak_entry_t { DisguisedPtr<objc_object> referent; union { struct { weak_referrer_t *referrers; uintptr_t out_of_line_ness : 2 ; uintptr_t num_refs : PTR_MINUS_2; uintptr_t mask; uintptr_t max_hash_displacement; }; struct { weak_referrer_t inline_referrers[WEAK_INLINE_COUNT]; }; }; };
通过上述的代码定义,我们可以得出 SideTable 的结构图:
清楚了 weak_table 的结构后,下面的增删改查方法的逻辑就清楚了。感兴趣的可以可源码。
1 2 3 4 5 6 7 8 9 10 11 12 id weak_register_no_lock(weak_table_t *weak_table, id referent, id *referrer, bool crashIfDeallocating); void weak_unregister_no_lock(weak_table_t *weak_table, id referent, id *referrer);bool weak_is_registered_no_lock(weak_table_t *weak_table, id referent);void weak_clear_no_lock(weak_table_t *weak_table, id referent);
AutoreleasePool 当我们创建一个自动释放池,然后在其中处理我们的业务时,自动释放池的底层是怎么运行的呢?现在我们探索下。
autoreleasepool 常用方法如下:
我们用 Clang 的 xcrun -sdk iphonesimulator clang -arch x86_64 -rewrite-objc main.m 将这段代码编译成 C++ 后,看看底层代码转换。
显示如下:
1 2 3 { __AtAutoreleasePool __autoreleasepool; }
也就是 autoreleasepool 会被转换成 __AtAutoreleasePool 类型的对象。看看这个对象的定义是啥?
1 2 3 4 5 6 7 8 extern "C" __declspec(dllimport) void * objc_autoreleasePoolPush(void); extern "C" __declspec(dllimport) void objc_autoreleasePoolPop(void *); struct __AtAutoreleasePool { __AtAutoreleasePool() {atautoreleasepoolobj = objc_autoreleasePoolPush();} ~__AtAutoreleasePool() {objc_autoreleasePoolPop(atautoreleasepoolobj);} void * atautoreleasepoolobj; };
通过定义,我们可以得出如下信息:
__AtAutoreleasePool 中有一个成员 atautoreleasepoolobj,当调用构造函数的时候,该成员会被创建,当调用析构函数的时候,会被销毁。{} 在这个作用域中,__autoreleasepool 对象会被创建,当出了这个作用域后,__autoreleasepool 会被销毁。也就是说,出了这个作用域,自动释放池的对象将会被销毁。
objc_autoreleasePoolPush & objc_autoreleasePoolPop 在 objc 的源码中,搜索这个关键字。可以找到如下信息:
1 2 3 4 5 6 7 8 9 10 11 12 void *objc_autoreleasePoolPush(void ) { return AutoreleasePoolPage::push(); } NEVER_INLINE void objc_autoreleasePoolPop(void *ctxt) { AutoreleasePoolPage::pop(ctxt); }
在 SideTablesMap 的分析中,我们看到了,AutoreleasePoolPage 也是在 SideTablesMap 初始化之前初始化的,那么 push 方法是添加了什么呢?
1 2 3 4 5 6 7 8 9 10 11 12 static inline void *push() { id *dest; if (slowpath(DebugPoolAllocation)) { dest = autoreleaseNewPage(POOL_BOUNDARY); } else { dest = autoreleaseFast(POOL_BOUNDARY); } ASSERT(dest == EMPTY_POOL_PLACEHOLDER || *dest == POOL_BOUNDARY); return dest; }
在源码中,主要逻辑是往 AutoreleasePoolPage 中添加了一个 POOL_BOUNDARY, POOL_BOUNDARY 的定义是 # define POOL_BOUNDARY nil。也就是,每当创建一个 autoreleasepool,就会往 AutoreleasePoolPage 中插入一个 nil 对象作为边界。
AutoreleasePoolPage 下面我们分下下,AutoreleasePoolPage 的结构:
1 2 3 4 class AutoreleasePoolPage : private AutoreleasePoolPageData{ }
通过源码,我们可以得出如下的信息:
1、AutoreleasePoolPage 是一个双向链表结构,通过 parent 可以找到前一个 page,通过 child 可以找到后一个 page。
2、AutoreleasePoolPage 的大小是 4096 字节,也就是可以存储 4k 的数据。
3、AutoreleasePoolPage 添加 obj 对象是采用栈的方式,也就是后进先出。
4、 对 AutoreleasePoolPage 的成员进行分析,AutoreleasePoolPage 自身占用 56 个字节存储相关信息,那么就剩下 4040 个字节存储要释放的对象。一个对象指针占用 8 个字节,那么每页最多能存储 505 个对象。
我们可以通过 _objc_autoreleasePoolPrint 方法打印出自动释放池中的对象。
1 extern void _objc_autoreleasePoolPrint(void );
1 2 3 4 5 6 7 @autoreleasepool { for (int i = 0 ; i < 5 ; i++) { NSObject *obj = [[NSObject alloc] init]; [obj autorelease]; } _objc_autoreleasePoolPrint(); }
通过打印结果,可以看到当前自动释放池中的对象如下:
1 2 3 4 5 6 7 8 9 10 11 12 13 14 15 16 objc[13299]: AUTORELEASE POOLS for thread 0x104b63880 objc[13299]: 228 releases pending. objc[13299]: [0x10500c000] ................ PAGE (hot) (cold) objc[13299]: [0x10500c038] ################ POOL 0x10500c038 objc[13299]: [0x10500c040] 0x2809a8710 _UIBoxedAutoreleasePoolMark objc[13299]: [0x10500c048] ################ POOL 0x10500c048 objc[13299]: [0x10500c050] ################ POOL 0x10500c050 .... .... objc[13299]: [0x10500c728] ################ POOL 0x10500c728 objc[13299]: [0x10500c730] 0x2809a86b0 NSObject objc[13299]: [0x10500c738] 0x2809a86a0 NSObject objc[13299]: [0x10500c740] 0x2809a8690 NSObject objc[13299]: [0x10500c748] 0x2809a8680 NSObject objc[13299]: [0x10500c750] 0x2809a8660 NSObject objc[13299]: ##############
通过打印结果,我们得知:
当前打印的自动释放池是线程 0x104b63880 的。
当前 AutoreleasePoolPage 的首地址是 0x10500c000, 他从 0x10500c038 开始存储对象的原因是,十六进制 38 转换成十进制后是 56。前面的的 56 个字节用于存储页自身的信息,这与前面的分析是一致的。
类似 POOL 0x10500c038 就是 POOL_BOUNDARY。
push 我们接下来看下 AutoreleasePoolPage 的 push, autorelease, pop 的方法逻辑。
push 的源代码如下:
1 2 3 4 5 6 7 8 9 10 11 12 static inline void *push() { id *dest; if (slowpath(DebugPoolAllocation)) { dest = autoreleaseNewPage(POOL_BOUNDARY); } else { dest = autoreleaseFast(POOL_BOUNDARY); } ASSERT(dest == EMPTY_POOL_PLACEHOLDER || *dest == POOL_BOUNDARY); return dest; }
上述代码的主要逻辑是在 page 中添加一个 POOL_BOUNDARY。我们看下非调试模式下的 autoreleaseFast 具体逻辑。
1 2 3 4 5 6 7 8 9 10 11 static inline id *autoreleaseFast(id obj){ AutoreleasePoolPage *page = hotPage(); if (page && !page->full()) { return page->add(obj); } else if (page) { return autoreleaseFullPage(obj, page); } else { return autoreleaseNoPage(obj); } }
autoreleaseFast 方法根据获取的 hotPage 是否可操作,分别调用了不同的 add 方法。add 方法的逻辑比较简单。源代码如下:
1 2 3 4 5 6 7 8 9 id *add(id obj){ ASSERT(!full()); unprotect(); id *ret = next; *next++ = obj; protect(); return ret; }
autoreleaseFullPage 方法的主要逻辑是,看下一个 page 是否存在,不存在的话,新建一个 page,next 也指向这个 page,然后设置为 hotPage,最后添加对象 obj。源码如下:
1 2 3 4 5 6 7 8 9 10 11 12 13 static __attribute__((noinline))id *autoreleaseFullPage(id obj, AutoreleasePoolPage *page){ ... do { if (page->child) page = page->child; else page = new AutoreleasePoolPage(page); } while (page->full()); setHotPage(page); return page->add(obj); }
autoreleaseNoPage 方法的主要逻辑是新生成一个 page,然后设置为 hotPage,最后添加对象 obj。源码如下:
1 2 3 4 5 6 7 8 9 10 11 12 13 14 15 static __attribute__((noinline))id *autoreleaseNoPage(id obj){ ... AutoreleasePoolPage *page = new AutoreleasePoolPage(nil ); setHotPage(page); if (pushExtraBoundary) { page->add(POOL_BOUNDARY); } return page->add(obj); }
autorelease autorelease 方法主要是调用上面的 autoreleaseFast 来添加对象的。源码如下:
1 2 3 4 5 6 7 8 static inline id autorelease(id obj){ ASSERT(obj); ASSERT(!obj->isTaggedPointer()); id *dest __unused = autoreleaseFast(obj); ASSERT(!dest || dest == EMPTY_POOL_PLACEHOLDER || *dest == obj); return obj; }
pop pop 方法的主要逻辑是获取 hotPage ,然后调用 popPage 方法来完成释放功能。popPage 方法源码如下:
1 2 3 4 5 6 7 8 9 10 11 12 13 14 15 16 17 18 19 20 21 22 23 24 25 26 27 28 29 template<bool allowDebug> static void popPage(void *token, AutoreleasePoolPage *page, id *stop) { if (allowDebug && PrintPoolHiwat) printHiwat(); page->releaseUntil(stop); if (allowDebug && DebugPoolAllocation && page->empty()) { AutoreleasePoolPage *parent = page->parent; page->kill(); setHotPage(parent); } else if (allowDebug && DebugMissingPools && page->empty() && !page->parent) { page->kill(); setHotPage(nil ); } else if (page->child) { if (page->lessThanHalfFull()) { page->child->kill(); } else if (page->child->child) { page->child->child->kill(); } } }
上述代码主要做了三件事情:
调用 releaseUntil 方法释放 page 中的对象,直到 stop 标志为止。
调用 kill 方法销毁空 page。
设置 hotPage。
releaseUntil 方法的核心逻辑是,沿着 parent 链,持续销毁对象,到边界后则停止。源码如下:
1 2 3 4 5 6 7 8 9 10 11 12 13 14 15 16 17 18 19 20 21 22 23 24 25 26 27 28 29 30 void releaseUntil(id *stop) { while (this ->next != stop) { AutoreleasePoolPage *page = hotPage(); while (page->empty()) { page = page->parent; setHotPage(page); } page->unprotect(); id obj = *--page->next; memset((void *)page->next, SCRIBBLE, sizeof (*page->next)); page->protect(); if (obj != POOL_BOUNDARY) { objc_release(obj); } } setHotPage(this ); #if DEBUG for (AutoreleasePoolPage *page = child; page; page = page->child) { ASSERT(page->empty()); } #endif }
内存管理的分析到现在就结束了。
后记 我是穆哥,卖码维生的一朵浪花。我们下次见。
参考资料